<?xml version="1.0" encoding="utf-8"?><?xml-stylesheet type="text/xml" href="https://blog.sayan.page/feed.xslt.xml"?><feed xmlns="http://www.w3.org/2005/Atom" ><generator uri="https://jekyllrb.com/" version="4.4.1">Jekyll</generator><link href="https://blog.sayan.page/feed.xml" rel="self" type="application/atom+xml" /><link href="https://blog.sayan.page/" rel="alternate" type="text/html" /><updated>2026-01-28T01:07:56+00:00</updated><id>https://blog.sayan.page/feed.xml</id><title type="html">Sayan’s Blog</title><subtitle>My writing focusses on machine learning, computer science and other topics that catch my fancy.</subtitle><author><name>Sayan Goswami</name></author><entry><title type="html">Using OpenCode with local LLMs via LM Studio</title><link href="https://blog.sayan.page/opencode-local-llms-lmstudio/" rel="alternate" type="text/html" title="Using OpenCode with local LLMs via LM Studio" /><published>2026-01-28T00:00:00+00:00</published><updated>2026-01-28T00:00:00+00:00</updated><id>https://blog.sayan.page/opencode-local-llms-lmstudio</id><content type="html" xml:base="https://blog.sayan.page/opencode-local-llms-lmstudio/"><![CDATA[<p><a href="https://opencode.ai">OpenCode</a> is an open source, terminal-based AI coding assistant – think Claude Code or Cursor but you can hook it up to your own models. By default it uses cloud providers, but the interesting bit is pairing it with <a href="https://lmstudio.ai">LM Studio</a> to run everything locally.</p>

<h2 id="install-opencode">install opencode</h2>

<div class="language-bash highlighter-rouge"><div class="highlight"><pre class="highlight"><code>curl <span class="nt">-fsSL</span> https://opencode.ai/install | bash
opencode <span class="nt">--version</span>
</code></pre></div></div>

<p>Config lives in <code class="language-plaintext highlighter-rouge">~/.config/opencode/</code>.</p>

<h2 id="point-it-at-lm-studio">point it at LM Studio</h2>

<p>Fire up LM Studio and load a code-focused model – something like Qwen3 Coder 30B works well if your hardware can handle it. Make sure the local server is running, by default it listens on <code class="language-plaintext highlighter-rouge">http://localhost:1234</code>.</p>

<p>Then edit <code class="language-plaintext highlighter-rouge">~/.config/opencode/opencode.json</code>:</p>

<div class="language-json highlighter-rouge"><div class="highlight"><pre class="highlight"><code><span class="p">{</span><span class="w">
    </span><span class="nl">"$schema"</span><span class="p">:</span><span class="w"> </span><span class="s2">"https://opencode.ai/config.json"</span><span class="p">,</span><span class="w">
    </span><span class="nl">"provider"</span><span class="p">:</span><span class="w"> </span><span class="p">{</span><span class="w">
        </span><span class="nl">"lmstudio"</span><span class="p">:</span><span class="w"> </span><span class="p">{</span><span class="w">
            </span><span class="nl">"npm"</span><span class="p">:</span><span class="w"> </span><span class="s2">"@ai-sdk/openai-compatible"</span><span class="p">,</span><span class="w">
            </span><span class="nl">"name"</span><span class="p">:</span><span class="w"> </span><span class="s2">"LM Studio (local)"</span><span class="p">,</span><span class="w">
            </span><span class="nl">"options"</span><span class="p">:</span><span class="w"> </span><span class="p">{</span><span class="w">
                </span><span class="nl">"baseURL"</span><span class="p">:</span><span class="w"> </span><span class="s2">"http://localhost:1234/v1"</span><span class="w">
            </span><span class="p">},</span><span class="w">
            </span><span class="nl">"models"</span><span class="p">:</span><span class="w"> </span><span class="p">{</span><span class="w">
                </span><span class="nl">"zai-org/glm-4.7-flash"</span><span class="p">:</span><span class="w"> </span><span class="p">{</span><span class="w">
                    </span><span class="nl">"name"</span><span class="p">:</span><span class="w"> </span><span class="s2">"glm-4.7-flash"</span><span class="w">
                </span><span class="p">}</span><span class="w">
            </span><span class="p">}</span><span class="w">
        </span><span class="p">}</span><span class="w">
    </span><span class="p">}</span><span class="w">
</span><span class="p">}</span><span class="w">
</span></code></pre></div></div>

<p>The key bit is <code class="language-plaintext highlighter-rouge">@ai-sdk/openai-compatible</code> – LM Studio exposes an OpenAI-compatible API, so this just works.</p>

<p>Launch <code class="language-plaintext highlighter-rouge">opencode</code> and run <code class="language-plaintext highlighter-rouge">/model</code> to verify. You should see “LM Studio (local)” as an available provider.</p>

<h2 id="why-this-matters">why this matters</h2>

<p>The nice thing about running everything locally is that your code never leaves your machine, there are no token limits, no API costs, and it works offline. The tradeoff is output quality – local models are getting better fast but still lag behind frontier cloud models for complex reasoning. For code review, refactoring suggestions, and boilerplate generation though, they work surprisingly well.</p>

<h2 id="references">references</h2>

<ul>
  <li><a href="https://opencode.ai">OpenCode</a></li>
  <li><a href="https://lmstudio.ai">LM Studio</a></li>
  <li><a href="https://medium.com/@linc89617/automating-code-security-review-a-practical-guide-to-opencode-lm-studio-03ea7f98ca6d">Yoyo Lin’s guide on OpenCode + LM Studio for security review</a></li>
</ul>]]></content><author><name>Sayan Goswami</name></author><summary type="html"><![CDATA[OpenCode is an open source, terminal-based AI coding assistant – think Claude Code or Cursor but you can hook it up to your own models. By default it uses cloud providers, but the interesting bit is pairing it with LM Studio to run everything locally.]]></summary></entry><entry><title type="html">TIL: `ctop` - think `top` but for containers</title><link href="https://blog.sayan.page/til-ctop/" rel="alternate" type="text/html" title="TIL: `ctop` - think `top` but for containers" /><published>2025-12-13T00:00:00+00:00</published><updated>2025-12-13T00:00:00+00:00</updated><id>https://blog.sayan.page/til-ctop</id><content type="html" xml:base="https://blog.sayan.page/til-ctop/"><![CDATA[<p>See: <a href="https://ctop.sh/">https://ctop.sh/</a>, described as:</p>

<blockquote>
  <p>concise commandline monitoring for containers</p>
</blockquote>]]></content><author><name>Sayan Goswami</name></author><summary type="html"><![CDATA[See: https://ctop.sh/, described as:]]></summary></entry><entry><title type="html">How to compute the size of Pytorch tensors</title><link href="https://blog.sayan.page/computing-size-of-tensors/" rel="alternate" type="text/html" title="How to compute the size of Pytorch tensors" /><published>2025-11-28T00:00:00+00:00</published><updated>2025-11-28T00:00:00+00:00</updated><id>https://blog.sayan.page/computing-size-of-tensors</id><content type="html" xml:base="https://blog.sayan.page/computing-size-of-tensors/"><![CDATA[<p>It is fairly simple to compute the in memory size of Pytorch tensors with two handy methods: <a href="https://docs.pytorch.org/docs/stable/generated/torch.numel.html#torch-numel"><code class="language-plaintext highlighter-rouge">numel</code></a> and <a href="https://docs.pytorch.org/docs/stable/generated/torch.Tensor.element_size.html#torch-tensor-element-size"><code class="language-plaintext highlighter-rouge">element_size</code></a>:</p>

<div class="language-python highlighter-rouge"><div class="highlight"><pre class="highlight"><code>
<span class="kn">import</span> <span class="n">torch</span>

<span class="k">def</span> <span class="nf">get_size</span><span class="p">(</span><span class="n">t</span><span class="p">:</span> <span class="n">torch</span><span class="p">.</span><span class="n">Tensor</span><span class="p">):</span>
    <span class="k">return</span> <span class="n">t</span><span class="p">.</span><span class="nf">numel</span><span class="p">()</span> <span class="o">*</span> <span class="n">t</span><span class="p">.</span><span class="nf">element_size</span><span class="p">()</span>

</code></pre></div></div>

<p>That’s it!</p>]]></content><author><name>Sayan Goswami</name></author><summary type="html"><![CDATA[It is fairly simple to compute the in memory size of Pytorch tensors with two handy methods: numel and element_size:]]></summary></entry><entry><title type="html">Reverse engineering PCB schematics using willpower and some sand paper!</title><link href="https://blog.sayan.page/reverse-engineering-pcbs/" rel="alternate" type="text/html" title="Reverse engineering PCB schematics using willpower and some sand paper!" /><published>2025-08-25T00:00:00+01:00</published><updated>2025-08-25T00:00:00+01:00</updated><id>https://blog.sayan.page/reverse-engineering-pcbs</id><content type="html" xml:base="https://blog.sayan.page/reverse-engineering-pcbs/"><![CDATA[]]></content><author><name>Sayan Goswami</name></author><summary type="html"><![CDATA[]]></summary></entry><entry><title type="html">Why does every browser pretend to be Mozilla?</title><link href="https://blog.sayan.page/the-mess-with-browser-user-agents/" rel="alternate" type="text/html" title="Why does every browser pretend to be Mozilla?" /><published>2025-06-23T00:00:00+01:00</published><updated>2025-06-23T00:00:00+01:00</updated><id>https://blog.sayan.page/the-mess-with-browser-user-agents</id><content type="html" xml:base="https://blog.sayan.page/the-mess-with-browser-user-agents/"><![CDATA[]]></content><author><name>Sayan Goswami</name></author><summary type="html"><![CDATA[]]></summary></entry><entry><title type="html">I’ve finally completed GTA V</title><link href="https://blog.sayan.page/gta-v-complete/" rel="alternate" type="text/html" title="I’ve finally completed GTA V" /><published>2025-02-11T00:00:00+00:00</published><updated>2025-02-11T00:00:00+00:00</updated><id>https://blog.sayan.page/gta-v-complete</id><content type="html" xml:base="https://blog.sayan.page/gta-v-complete/"><![CDATA[<p>12 years after launch, I’ve finally completed the story mode of GTA V.</p>

<p><img src="/images/gta-v.png" alt="Franklin, Michael &amp; Lamar after the final story mode mission of GTA V" /></p>

<p>It was a nice game but it did not really last for as long as I had hoped for.</p>]]></content><author><name>Sayan Goswami</name></author><summary type="html"><![CDATA[12 years after launch, I’ve finally completed the story mode of GTA V.]]></summary></entry><entry><title type="html">How to subscribe to GitHub Gists Atom feeds</title><link href="https://blog.sayan.page/gist-rss-feed/" rel="alternate" type="text/html" title="How to subscribe to GitHub Gists Atom feeds" /><published>2025-01-21T00:00:00+00:00</published><updated>2025-01-21T00:00:00+00:00</updated><id>https://blog.sayan.page/gist-rss-feed</id><content type="html" xml:base="https://blog.sayan.page/gist-rss-feed/"><![CDATA[<p>While reading <a href="https://gist.github.com/hackermondev/45a3cdfa52246f1d1201c1e8cdef6117">hackermondevs writeup</a> on deanonymization attacks, I wondered if it was possible to subscribe to a Atom/RSS feed of GitHub Gists.</p>

<p>You can, just add .atom to the original URL of the Gist profile and et voilà!</p>

<p>More verbosely, subscribe to <code class="language-plaintext highlighter-rouge">https://gist.github.com/{username}.atom</code> from your feed reader of choice.</p>]]></content><author><name>Sayan Goswami</name></author><summary type="html"><![CDATA[While reading hackermondevs writeup on deanonymization attacks, I wondered if it was possible to subscribe to a Atom/RSS feed of GitHub Gists.]]></summary></entry><entry><title type="html">Time Machine backups over SMB</title><link href="https://blog.sayan.page/time-machine-backup-smb/" rel="alternate" type="text/html" title="Time Machine backups over SMB" /><published>2024-12-20T00:00:00+00:00</published><updated>2024-12-20T00:00:00+00:00</updated><id>https://blog.sayan.page/time-machine-backup-smb</id><content type="html" xml:base="https://blog.sayan.page/time-machine-backup-smb/"><![CDATA[]]></content><author><name>Sayan Goswami</name></author><summary type="html"><![CDATA[]]></summary></entry><entry><title type="html">TIL: Firecracker VM</title><link href="https://blog.sayan.page/til-firecracker-vm/" rel="alternate" type="text/html" title="TIL: Firecracker VM" /><published>2024-12-03T00:00:00+00:00</published><updated>2024-12-03T00:00:00+00:00</updated><id>https://blog.sayan.page/til-firecracker-vm</id><content type="html" xml:base="https://blog.sayan.page/til-firecracker-vm/"><![CDATA[<p>TIL about <a href="https://firecracker-microvm.github.io">Firecracker VM</a>, the underlying software powering AWS Lambdas and Fargate.</p>

<blockquote>
  <p>Firecracker is an open source virtualization technology that is purpose-built for creating and managing secure, multi-tenant container and function-based services.</p>
</blockquote>

<blockquote>
  <p>Firecracker enables you to deploy workloads in lightweight virtual machines, called microVMs, which provide enhanced security and workload isolation over traditional VMs, while enabling the speed and resource efficiency of containers.</p>
</blockquote>

<blockquote>
  <p>Firecracker is a virtual machine monitor (VMM) that uses the Linux Kernel-based Virtual Machine (KVM) to create and manage microVMs.</p>
</blockquote>

<blockquote>
  <p>Firecracker is generally available on 64-bit Intel, AMD and Arm CPUs with support for hardware virtualization. 🤯</p>
</blockquote>

<p>Julia Evans has a fantastic post on the same: <a href="https://jvns.ca/blog/2021/01/23/firecracker--start-a-vm-in-less-than-a-second/">Firecracker: start a VM in less than a second</a>, you should give it a read!</p>]]></content><author><name>Sayan Goswami</name></author><summary type="html"><![CDATA[TIL about Firecracker VM, the underlying software powering AWS Lambdas and Fargate.]]></summary></entry><entry><title type="html">TIL: V8 Isolates</title><link href="https://blog.sayan.page/til-v8-isolate/" rel="alternate" type="text/html" title="TIL: V8 Isolates" /><published>2024-12-03T00:00:00+00:00</published><updated>2024-12-03T00:00:00+00:00</updated><id>https://blog.sayan.page/til-v8-isolate</id><content type="html" xml:base="https://blog.sayan.page/til-v8-isolate/"><![CDATA[<p>While reading <a href="https://developers.cloudflare.com/workers/reference/how-workers-works/#isolates">How Workers works</a> on Cloudflare’s blog, I learned about V8 Isolates.</p>

<blockquote>
  <p>V8 orchestrates isolates: lightweight contexts that provide your code with variables it can access and a safe environment to be executed within. You could even consider an isolate a sandbox for your function to run in.</p>

  <p>A single instance of the runtime can run hundreds or thousands of isolates, seamlessly switching between them. Each isolate’s memory is completely isolated, so each piece of code is protected from other untrusted or user-written code on the runtime. Isolates are also designed to start very quickly. Instead of creating a virtual machine for each function, an isolate is created within an existing environment. This model eliminates the cold starts of the virtual machine model.</p>
</blockquote>

<p>That reads suspiciously like threads, doesn’t it? Yes, sort of – it depends on the implementation. <a href="https://chromium.googlesource.com/chromium/src/+/master/third_party/blink/renderer/bindings/core/v8/V8BindingDesign.md#isolate">This</a> is what Chromium’s Blink has to say:</p>

<blockquote>
  <p>An isolate is a concept of an instance in V8. In Blink, isolates and threads are in 1:1 relationship. One isolate is associated with the main thread. One isolate is associated with one worker thread.</p>
</blockquote>

<p>Anyway, circling back to what Cloudflare workers – I wonder what the implications for security and isolation are across the various isolates? 
There’s various threads of discussion on this, notably <a href="https://news.ycombinator.com/item?id=31759170">this thread</a> from the orange website.
It defers the decision to <em>it depends</em> with process based isolation being preferred when running untrusted code.</p>]]></content><author><name>Sayan Goswami</name></author><summary type="html"><![CDATA[While reading How Workers works on Cloudflare’s blog, I learned about V8 Isolates.]]></summary></entry><entry><title type="html">RSS feeds can have styles (sort of)</title><link href="https://blog.sayan.page/styling-rss-feeds/" rel="alternate" type="text/html" title="RSS feeds can have styles (sort of)" /><published>2024-12-02T00:00:00+00:00</published><updated>2024-12-02T00:00:00+00:00</updated><id>https://blog.sayan.page/styling-rss-feeds</id><content type="html" xml:base="https://blog.sayan.page/styling-rss-feeds/"><![CDATA[<p>While reading https://boehs.org/node/dark-web-security, I noticed something weird with their blog feed page.</p>

<p><img src="/images/styled-rss-feed.png" alt="styled atom feed page" /></p>

<p>Yep, that’s right – there’s CSS in that Atom feed, turns out you can do it.</p>

<p>Here’s another blog posting describing how: https://andrewstiefel.com/style-atom-xsl/.</p>

<p>And now its in action here: https://blog.sayan.page/feed.xml, that’s all!</p>]]></content><author><name>Sayan Goswami</name></author><summary type="html"><![CDATA[While reading https://boehs.org/node/dark-web-security, I noticed something weird with their blog feed page.]]></summary></entry><entry><title type="html">How to setup multiple admin accounts on Immich</title><link href="https://blog.sayan.page/immich-multiple-admins/" rel="alternate" type="text/html" title="How to setup multiple admin accounts on Immich" /><published>2024-07-14T00:00:00+01:00</published><updated>2024-07-14T00:00:00+01:00</updated><id>https://blog.sayan.page/immich-multiple-admins</id><content type="html" xml:base="https://blog.sayan.page/immich-multiple-admins/"><![CDATA[<p>This guide assumes you’re running Immich using the <a href="https://immich.app/docs/install/docker-compose">recommended</a> installation method.</p>

<h2 id="connect-to-the-postgress-database-docker-container">connect to the postgress database docker container</h2>

<p><code class="language-plaintext highlighter-rouge">docker exec -it immich_postgres bash</code></p>

<h2 id="connect-to-the-postgress-shell-in-the-container-and-load-the-immich-database">connect to the postgress shell in the container and load the immich database</h2>

<p><code class="language-plaintext highlighter-rouge">psql immich postgres</code></p>

<h2 id="check-which-users-are-currently-admin-users">check which users are currently admin users</h2>

<pre><code class="language-psql">immich=# select email,"isAdmin" from users;
</code></pre>

<h2 id="promote-an-existing-user-to-the-admin-role">promote an existing user to the admin role</h2>

<pre><code class="language-psql">UPDATE users SET "isAdmin"='t' WHERE email='email@example.com';
</code></pre>

<p>And that’s it!</p>]]></content><author><name>Sayan Goswami</name></author><summary type="html"><![CDATA[This guide assumes you’re running Immich using the recommended installation method.]]></summary></entry><entry><title type="html">Setting up `mitmproxy` on iOS</title><link href="https://blog.sayan.page/mitm-proxy-on-ios/" rel="alternate" type="text/html" title="Setting up `mitmproxy` on iOS" /><published>2024-04-21T00:00:00+01:00</published><updated>2024-04-21T00:00:00+01:00</updated><id>https://blog.sayan.page/mitm-proxy-on-ios</id><content type="html" xml:base="https://blog.sayan.page/mitm-proxy-on-ios/"><![CDATA[<h2 id="install-the-mitmproxy-server">install the <code class="language-plaintext highlighter-rouge">mitmproxy</code> server</h2>

<p>Install the <code class="language-plaintext highlighter-rouge">mitmproxy</code> server on your platform of choice.
The instructions on <a href="https://docs.mitmproxy.org/stable/overview-installation/">mitmproxy.org</a> are fairly straightforward to follow!
After installing, run the <code class="language-plaintext highlighter-rouge">mitmproxy</code> command to start the proxy server.</p>

<p>Note the IP address/hostname (let’s call this <code class="language-plaintext highlighter-rouge">proxyhost</code>) of the computer that is running the proxy server, by default the server listens on port <strong>8080</strong>.
Essentially, we should have the proxy server reachable at <code class="language-plaintext highlighter-rouge">proxyhost:8080</code> now for any device on the same network as the proxy server.</p>

<h2 id="configure-your-ios-device-to-use-the-proxy">configure your iOS device to use the proxy</h2>

<p>Head over to Settings &gt; WiFi and then tap on the (i) icon beside the network your are connected to.</p>

<p><strong>See</strong>: <a href="/images/mitm-proxy-on-ios/0.png">Screenshot 0</a></p>

<p>Scroll down to the bottom of the page and then tap on the option that says “Configure Proxy”.</p>

<p><strong>See</strong>: <a href="/images/mitm-proxy-on-ios/1.png">Screenshot 1</a></p>

<p>Use the proxy server IP and port from earlier (<code class="language-plaintext highlighter-rouge">proxyhost:8080</code>) and hit save.</p>

<p><strong>See</strong>: <a href="/images/mitm-proxy-on-ios/2.png">Screenshot 2</a></p>

<p>Open Safar on the iOS device and head over to <a href="mitm.it">mitm.it</a>.
You will be greeted with a page that lists CA certificates for various platforms, tap on the one that is for iOS.</p>

<p><strong>See</strong>: <a href="/images/mitm-proxy-on-ios/3.png">Screenshot 3</a></p>

<p>Tap on allow to download <code class="language-plaintext highlighter-rouge">mitmproxy</code>’s CA cert to the iOS device’s certificate store.</p>

<p><strong>See</strong>: <a href="/images/mitm-proxy-on-ios/4.png">Screenshot 4</a></p>

<p>Choose the device that you want to install the CA certificate too. Most likely you would want to choose the iPhone from the list.</p>

<p><strong>See</strong>: <a href="/images/mitm-proxy-on-ios/5.png">Screenshot 5</a></p>

<p>The CA certificate for <code class="language-plaintext highlighter-rouge">mitmproxy</code> is now downloaded, we need to head on over to the Settings apps now.</p>

<p><strong>See</strong>: <a href="/images/mitm-proxy-on-ios/6.png">Screenshot 6</a></p>

<p>When you open the Settings app on iOS device, you’ll be greeted with a list item titled “Profile Downloaded”. Tap on that!</p>

<p><strong>See</strong>: <a href="/images/mitm-proxy-on-ios/7.png">Screenshot 7</a></p>

<p>Then tap on the “Install” button on the top right corner.</p>

<p><strong>See</strong>: <a href="/images/mitm-proxy-on-ios/8.png">Screenshot 8</a></p>

<p>After that head on to Settings &gt; General &gt; About and scroll down to the bottom of the page.
You will see a menu item titled “Certificate Trust Settings”.
Tap on it, in the following page enable the certifcate for <code class="language-plaintext highlighter-rouge">mitmproxy</code>.</p>

<p><strong>See</strong>: <a href="/images/mitm-proxy-on-ios/9.png">Screenshot 9</a></p>

<h2 id="profit">profit</h2>

<p>That’s it, you will now be able to intercept SSL traffic from your iOS device on the proxy server.</p>

<h2 id="cleaning-up">cleaning up</h2>

<p>I would recommend disabling or removing the <code class="language-plaintext highlighter-rouge">mitmproxy</code> CA certificate when not in use, you can simply toggle it in Settings &gt; General &gt; About &gt; Certificate Trust Settings.</p>

<p>You would also need to disable the proxy server configuration for the network whenever you turn off the proxy server.
You can do that by heading over to Settings &gt; WiFi and then tap on the (i) icon beside the network your are connected to.
Scroll down to the bottom of the page and then tap on the option that says “Configure Proxy” and then tap on the “Off” option from the list.</p>

<h2 id="caveats">caveats</h2>

<p>You will not be able to interecept SSL traffic for any application that uses certificate pinning.
This is because these applications bypass the system certificate store and have their own trust store for certificates.
See <a href="https://docs.mitmproxy.org/stable/concepts-certificates/#certificate-pinning">https://docs.mitmproxy.org/stable/concepts-certificates/#certificate-pinning</a> on working around certificate pinning.</p>]]></content><author><name>Sayan Goswami</name></author><summary type="html"><![CDATA[install the mitmproxy server]]></summary></entry><entry><title type="html">Who registers your domain names?</title><link href="https://blog.sayan.page/mark-monitor/" rel="alternate" type="text/html" title="Who registers your domain names?" /><published>2024-03-24T00:00:00+00:00</published><updated>2024-03-24T00:00:00+00:00</updated><id>https://blog.sayan.page/mark-monitor</id><content type="html" xml:base="https://blog.sayan.page/mark-monitor/"><![CDATA[<p>Most of us register and renew our domain names through various registrars such as Namecheap, Godaddy, the <a href="https://support.google.com/domains/answer/13689670">late Google domains</a> etc. 
But how do the fortune 500 companies do it? I am glad you asked!</p>

<p>This is where companies like <a href="https://en.wikipedia.org/wiki/Markmonitor">Markmonitor</a> come into the picture. Their services include:</p>

<blockquote>
  <p>software intended to protect corporate brands from Internet counterfeiting, fraud, piracy, and cybersquatting</p>
</blockquote>

<p>Markmonitor has an impressive clientele involving the likes of companies such as Amazon, Google, Akamai, Alibaba, Baidu etc!</p>

<p>Essentially, think of Markmonitor as a service that reminds you to pay for your domain names before they expire so that you aren’t bullied into someone on the interwebs squatting your domain name.
This is quite amusing to me as an individual but it is a sensible service nonetheless that benefits corporations.</p>

<p>I still find it quite hard to wrap my head around this. :)</p>

<h4 id="appendix">Appendix</h4>

<h5 id="amazoncom">amazon.com</h5>

<div class="language-plaintext highlighter-rouge"><div class="highlight"><pre class="highlight"><code># whois.markmonitor.com

Domain Name: amazon.com
Registry Domain ID: 281209_DOMAIN_COM-VRSN
Registrar WHOIS Server: whois.markmonitor.com
Registrar URL: http://www.markmonitor.com
Updated Date: 2023-05-16T18:56:31+0000
Creation Date: 1994-11-01T05:00:00+0000
Registrar Registration Expiration Date: 2024-10-30T07:00:00+0000
Registrar: MarkMonitor, Inc.
</code></pre></div></div>

<h5 id="akamaicom">akamai.com</h5>

<div class="language-plaintext highlighter-rouge"><div class="highlight"><pre class="highlight"><code># whois.markmonitor.com

Domain Name: akamai.com
Registry Domain ID: 2906556_DOMAIN_COM-VRSN
Registrar WHOIS Server: whois.markmonitor.com
Registrar URL: http://www.markmonitor.com
Updated Date: 2022-04-11T18:10:46+0000
Creation Date: 1998-08-17T04:00:00+0000
Registrar Registration Expiration Date: 2024-08-16T04:00:00+0000
Registrar: MarkMonitor, Inc.
</code></pre></div></div>

<h5 id="googlecom">google.com</h5>

<div class="language-plaintext highlighter-rouge"><div class="highlight"><pre class="highlight"><code># whois.markmonitor.com

Domain Name: google.com
Registry Domain ID: 2138514_DOMAIN_COM-VRSN
Registrar WHOIS Server: whois.markmonitor.com
Registrar URL: http://www.markmonitor.com
Updated Date: 2019-09-09T15:39:04+0000
Creation Date: 1997-09-15T07:00:00+0000
Registrar Registration Expiration Date: 2028-09-13T07:00:00+0000
Registrar: MarkMonitor, Inc.
</code></pre></div></div>]]></content><author><name>Sayan Goswami</name></author><summary type="html"><![CDATA[Most of us register and renew our domain names through various registrars such as Namecheap, Godaddy, the late Google domains etc. But how do the fortune 500 companies do it? I am glad you asked!]]></summary></entry><entry><title type="html">`tar` is fun?</title><link href="https://blog.sayan.page/tar-is-fun/" rel="alternate" type="text/html" title="`tar` is fun?" /><published>2023-12-24T00:00:00+00:00</published><updated>2023-12-24T00:00:00+00:00</updated><id>https://blog.sayan.page/tar-is-fun</id><content type="html" xml:base="https://blog.sayan.page/tar-is-fun/"><![CDATA[<p>Have you ever wondered why the unix command <code class="language-plaintext highlighter-rouge">tar</code> is a cryptic mess and everytime you need to use it you need to head back to the man page to look them up?
Well fear no more – you could just remember these mnemonic flags instead and make your life easier!</p>

<div class="language-plaintext highlighter-rouge"><div class="highlight"><pre class="highlight"><code>$ file archive.tar.gz
archive.tar.gz: gzip compressed data, last modified: Sun Dec 24 13:42:15 2023, from Unix, original size modulo 2^32 1372672
</code></pre></div></div>

<h2 id="list-contents-of-an-archive">list contents of an archive</h2>

<p>Use <code class="language-plaintext highlighter-rouge">wtf</code>: what the fuck is in that archive?</p>

<div class="language-shell highlighter-rouge"><div class="highlight"><pre class="highlight"><code><span class="nv">$ </span><span class="nb">tar </span>wtf archive.tar.gz
- 8&lt;-
</code></pre></div></div>

<h2 id="extract-the-archive">extract the archive</h2>

<p>Use <code class="language-plaintext highlighter-rouge">pfx</code>: please fucking extract the archive!</p>

<div class="language-shell highlighter-rouge"><div class="highlight"><pre class="highlight"><code><span class="nv">$ </span><span class="nb">tar </span>pfx archive.tar.gz
- 8&lt;-
</code></pre></div></div>]]></content><author><name>Sayan Goswami</name></author><summary type="html"><![CDATA[Have you ever wondered why the unix command tar is a cryptic mess and everytime you need to use it you need to head back to the man page to look them up? Well fear no more – you could just remember these mnemonic flags instead and make your life easier!]]></summary></entry><entry><title type="html">Netflix: Stats for Nerds</title><link href="https://blog.sayan.page/netflix-debug-mode/" rel="alternate" type="text/html" title="Netflix: Stats for Nerds" /><published>2022-07-11T00:00:00+01:00</published><updated>2022-07-11T00:00:00+01:00</updated><id>https://blog.sayan.page/netflix-debug-mode</id><content type="html" xml:base="https://blog.sayan.page/netflix-debug-mode/"><![CDATA[<p>Netflix on desktop has a hidden debug menu. The key combinations to trigger it are</p>

<p>MacOS: <kbd>Ctrl</kbd> + <kbd>Shift</kbd> + <kbd>Option</kbd> + <kbd>Q</kbd></p>

<p>Windows: <kbd>Ctrl</kbd> + <kbd>Shift</kbd> + <kbd>Alt</kbd> + <kbd>Q</kbd></p>

<p>This will bring up an overlay dialog with wide range of statistics and debugging information.</p>

<p><strong>Note</strong>: This shortcut does not work when you are in fullscreen mode.</p>]]></content><author><name>Sayan Goswami</name></author><summary type="html"><![CDATA[Netflix on desktop has a hidden debug menu. The key combinations to trigger it are]]></summary></entry><entry><title type="html">TIL: Recondite Python</title><link href="https://blog.sayan.page/til-recondite-python/" rel="alternate" type="text/html" title="TIL: Recondite Python" /><published>2022-07-01T00:00:00+01:00</published><updated>2022-07-01T00:00:00+01:00</updated><id>https://blog.sayan.page/til-recondite-python</id><content type="html" xml:base="https://blog.sayan.page/til-recondite-python/"><![CDATA[<p>This page is a collection of obscure facts about the Python programming language.</p>

<h2 class="no_toc" id="table-of-contents">Table of Contents</h2>

<ul id="markdown-toc">
  <li><a href="#the-__debug__-constant" id="markdown-toc-the-__debug__-constant">the <code class="language-plaintext highlighter-rouge">__debug__</code> constant</a>    <ul>
      <li><a href="#__debug__-in-repl-shell" id="markdown-toc-__debug__-in-repl-shell"><code class="language-plaintext highlighter-rouge">__debug__</code> in REPL shell</a></li>
      <li><a href="#__debug__-in-scripts" id="markdown-toc-__debug__-in-scripts"><code class="language-plaintext highlighter-rouge">__debug__</code> in scripts</a></li>
    </ul>
  </li>
</ul>

<h2 id="the-__debug__-constant">the <code class="language-plaintext highlighter-rouge">__debug__</code> constant</h2>

<p>Python has a <a href="https://docs.python.org/3/library/constants.html#debug__" target="_blank">built-in boolean constant</a>
named <code class="language-plaintext highlighter-rouge">__debug__</code>.</p>

<p>It is set to <code class="language-plaintext highlighter-rouge">True</code> whenever you run a REPL shell or call a script with the
<code class="language-plaintext highlighter-rouge">python script.py</code> i.e. by default.</p>

<p>It is set to <code class="language-plaintext highlighter-rouge">False</code> only when you pass the <code class="language-plaintext highlighter-rouge">-O</code> or the <code class="language-plaintext highlighter-rouge">-OO</code> flags to the python executable.</p>

<p>These flags are described in the Python manual page as:</p>

<p><code class="language-plaintext highlighter-rouge">-O</code> Remove assert statements and any code conditional on the value of <strong>debug</strong>;
augment the filename for compiled (bytecode) files by adding .opt-1 before the .pyc
extension.</p>

<p><code class="language-plaintext highlighter-rouge">-OO</code> Do <code class="language-plaintext highlighter-rouge">-O</code> and also discard docstrings; change the filename for compiled
(bytecode) files by adding .opt-2 before the .pyc extension.</p>

<h3 id="__debug__-in-repl-shell"><code class="language-plaintext highlighter-rouge">__debug__</code> in REPL shell</h3>

<div class="language-bash highlighter-rouge"><div class="highlight"><pre class="highlight"><code><span class="nv">$ </span>python3
Python 3.9.13 <span class="o">(</span>main, May 24 2022, 21:28:31<span class="o">)</span>
<span class="o">[</span>Clang 13.1.6 <span class="o">(</span>clang-1316.0.21.2<span class="o">)]</span> on darwin
Type <span class="s2">"help"</span>, <span class="s2">"copyright"</span>, <span class="s2">"credits"</span> or <span class="s2">"license"</span> <span class="k">for </span>more information.
<span class="o">&gt;&gt;&gt;</span> __debug__
True

</code></pre></div></div>

<div class="language-bash highlighter-rouge"><div class="highlight"><pre class="highlight"><code><span class="nv">$ </span>python3 <span class="nt">-O</span>
Python 3.9.13 <span class="o">(</span>main, May 24 2022, 21:28:31<span class="o">)</span>
<span class="o">[</span>Clang 13.1.6 <span class="o">(</span>clang-1316.0.21.2<span class="o">)]</span> on darwin
Type <span class="s2">"help"</span>, <span class="s2">"copyright"</span>, <span class="s2">"credits"</span> or <span class="s2">"license"</span> <span class="k">for </span>more information.
<span class="o">&gt;&gt;&gt;</span> __debug__
False

</code></pre></div></div>

<h3 id="__debug__-in-scripts"><code class="language-plaintext highlighter-rouge">__debug__</code> in scripts</h3>

<div class="language-bash highlighter-rouge"><div class="highlight"><pre class="highlight"><code><span class="nv">$ </span><span class="nb">cat </span>script.py
print<span class="o">(</span>__debug__<span class="o">)</span>

<span class="nv">$ </span>python3 script.py
True
<span class="nv">$ </span>python3 <span class="nt">-O</span> script.py
False
<span class="nv">$ </span>python3 <span class="nt">-OO</span> script.py
False
</code></pre></div></div>]]></content><author><name>Sayan Goswami</name></author><summary type="html"><![CDATA[This page is a collection of obscure facts about the Python programming language.]]></summary></entry><entry><title type="html">Anatomy of a DNS Amplification Attack</title><link href="https://blog.sayan.page/dns-amplification-go/" rel="alternate" type="text/html" title="Anatomy of a DNS Amplification Attack" /><published>2022-06-19T00:00:00+01:00</published><updated>2022-06-19T00:00:00+01:00</updated><id>https://blog.sayan.page/dns-amplification-go</id><content type="html" xml:base="https://blog.sayan.page/dns-amplification-go/"><![CDATA[<p>A <strong>DNS amplification attack</strong> is a kind of <strong>d</strong>istributed <strong>d</strong>enial <strong>o</strong>f <strong>s</strong>ervice (DDoS) attack in which an
attacker leverages open DNS servers to overwhelm a target with a huge influx of UDP packets.
This influx of spurious traffic renders the victim inaccessible to legitimate traffic thereby accomplishing the denial
of service.</p>

<p><img src="/images/dns-amplification.png" alt="DNS amplification attack" /></p>

<h2 class="no_toc" id="table-of-contents">Table of Contents</h2>

<ul id="markdown-toc">
  <li><a href="#dns-the-what-and-the-how" id="markdown-toc-dns-the-what-and-the-how"><strong>DNS</strong>: the what and the how</a>    <ul>
      <li><a href="#the-what" id="markdown-toc-the-what">the what</a></li>
      <li><a href="#the-how" id="markdown-toc-the-how">the how</a></li>
    </ul>
  </li>
  <li><a href="#where-is-the-amplification-at" id="markdown-toc-where-is-the-amplification-at">where is the <strong>amplification</strong> at?</a></li>
  <li><a href="#but-how-is-it-an-attack" id="markdown-toc-but-how-is-it-an-attack">but how is it an <strong>attack</strong>?</a></li>
  <li><a href="#enough-talk-show-me-the-code" id="markdown-toc-enough-talk-show-me-the-code">enough talk, show me the <strong>code</strong></a></li>
</ul>

<h1 id="dns-the-what-and-the-how"><strong>DNS</strong>: the what and the how</h1>

<h2 id="the-what">the what</h2>

<p>The <strong>d</strong>omain <strong>n</strong>ame <strong>s</strong>ystem (DNS), for the lack of a better analogy, is similar to the concept of phone books.
You know the name of the person you want to reach but you don’t know their phone number – so you look it up in the
phone book and connect to them.</p>

<p>Unlike phone numbers that we humans use to communicate, computers communicate with each other via IP addresses.</p>

<p>When you want to visit a website – say <em>instagram.com</em> – your computer does not know where that is.
So, your computer queries the DNS servers on the internet that it knows about to ask about the website that you want to
visit.
Think of these DNS servers as numerous phone books of the internet which are regularly updated.
In turn, the DNS server reverts back with a (or often several) IP addresses of the website that you want to reach.</p>

<p>This was a tiny summary describing the task of DNS servers, you can visit <a href="https://www.cloudflare.com/en-in/learning/dns/what-is-dns/">Cloudflare’s fantastic blog
post</a> on it if interests you.</p>

<h2 id="the-how">the how</h2>

<p>I won’t delve into the detail as to the structure of DNS requests or the underlying UDP frames that carry these as
payload other than stating that the DNS query is encapsulated by a UDP frame and is then catapulted to the realms of
the internet in hope of a response from the DNS server (UDP is stateless, connectionless and unreliable).</p>

<p>If you are interested to read up more on the structure of DNS packets you can have a look at this fantastic article
titled <a href="https://w3.cs.jmu.edu/kirkpams/OpenCSF/Books/csf/html/UDPSockets.html">“UDP Socket Programming: DNS”</a> and if
you want to learn more about the structure of UDP frames, you can have a look at the
<a href="https://en.wikipedia.org/wiki/User_Datagram_Protocol#UDP_datagram_structure">Wikipedia article on UDP</a>.</p>

<h1 id="where-is-the-amplification-at">where is the <strong>amplification</strong> at?</h1>

<p>When there is a disparity between the size of the response of a query and the query itself, an attacker is able to
exploit the difference and gain more damage from a lesser expense.
Responses to a DNS query such as <a href="https://www.ietf.org/rfc/rfc1035.html#section-3.2.3">zone transfers</a> or a <a href="https://datatracker.ietf.org/doc/html/rfc8482#section-2">query for all resource records</a> are generally
a lot larger than the query message itself.</p>

<p>If you run <code class="language-plaintext highlighter-rouge">dig @1.1 ANY google.com</code> command in your terminal and capture the resulting traffic, you will notice
something like the screenshot below.</p>

<p><img src="/images/dns-any-google.png" alt="Output of the command `dig @1.1 ANY google.com`" /></p>

<p>
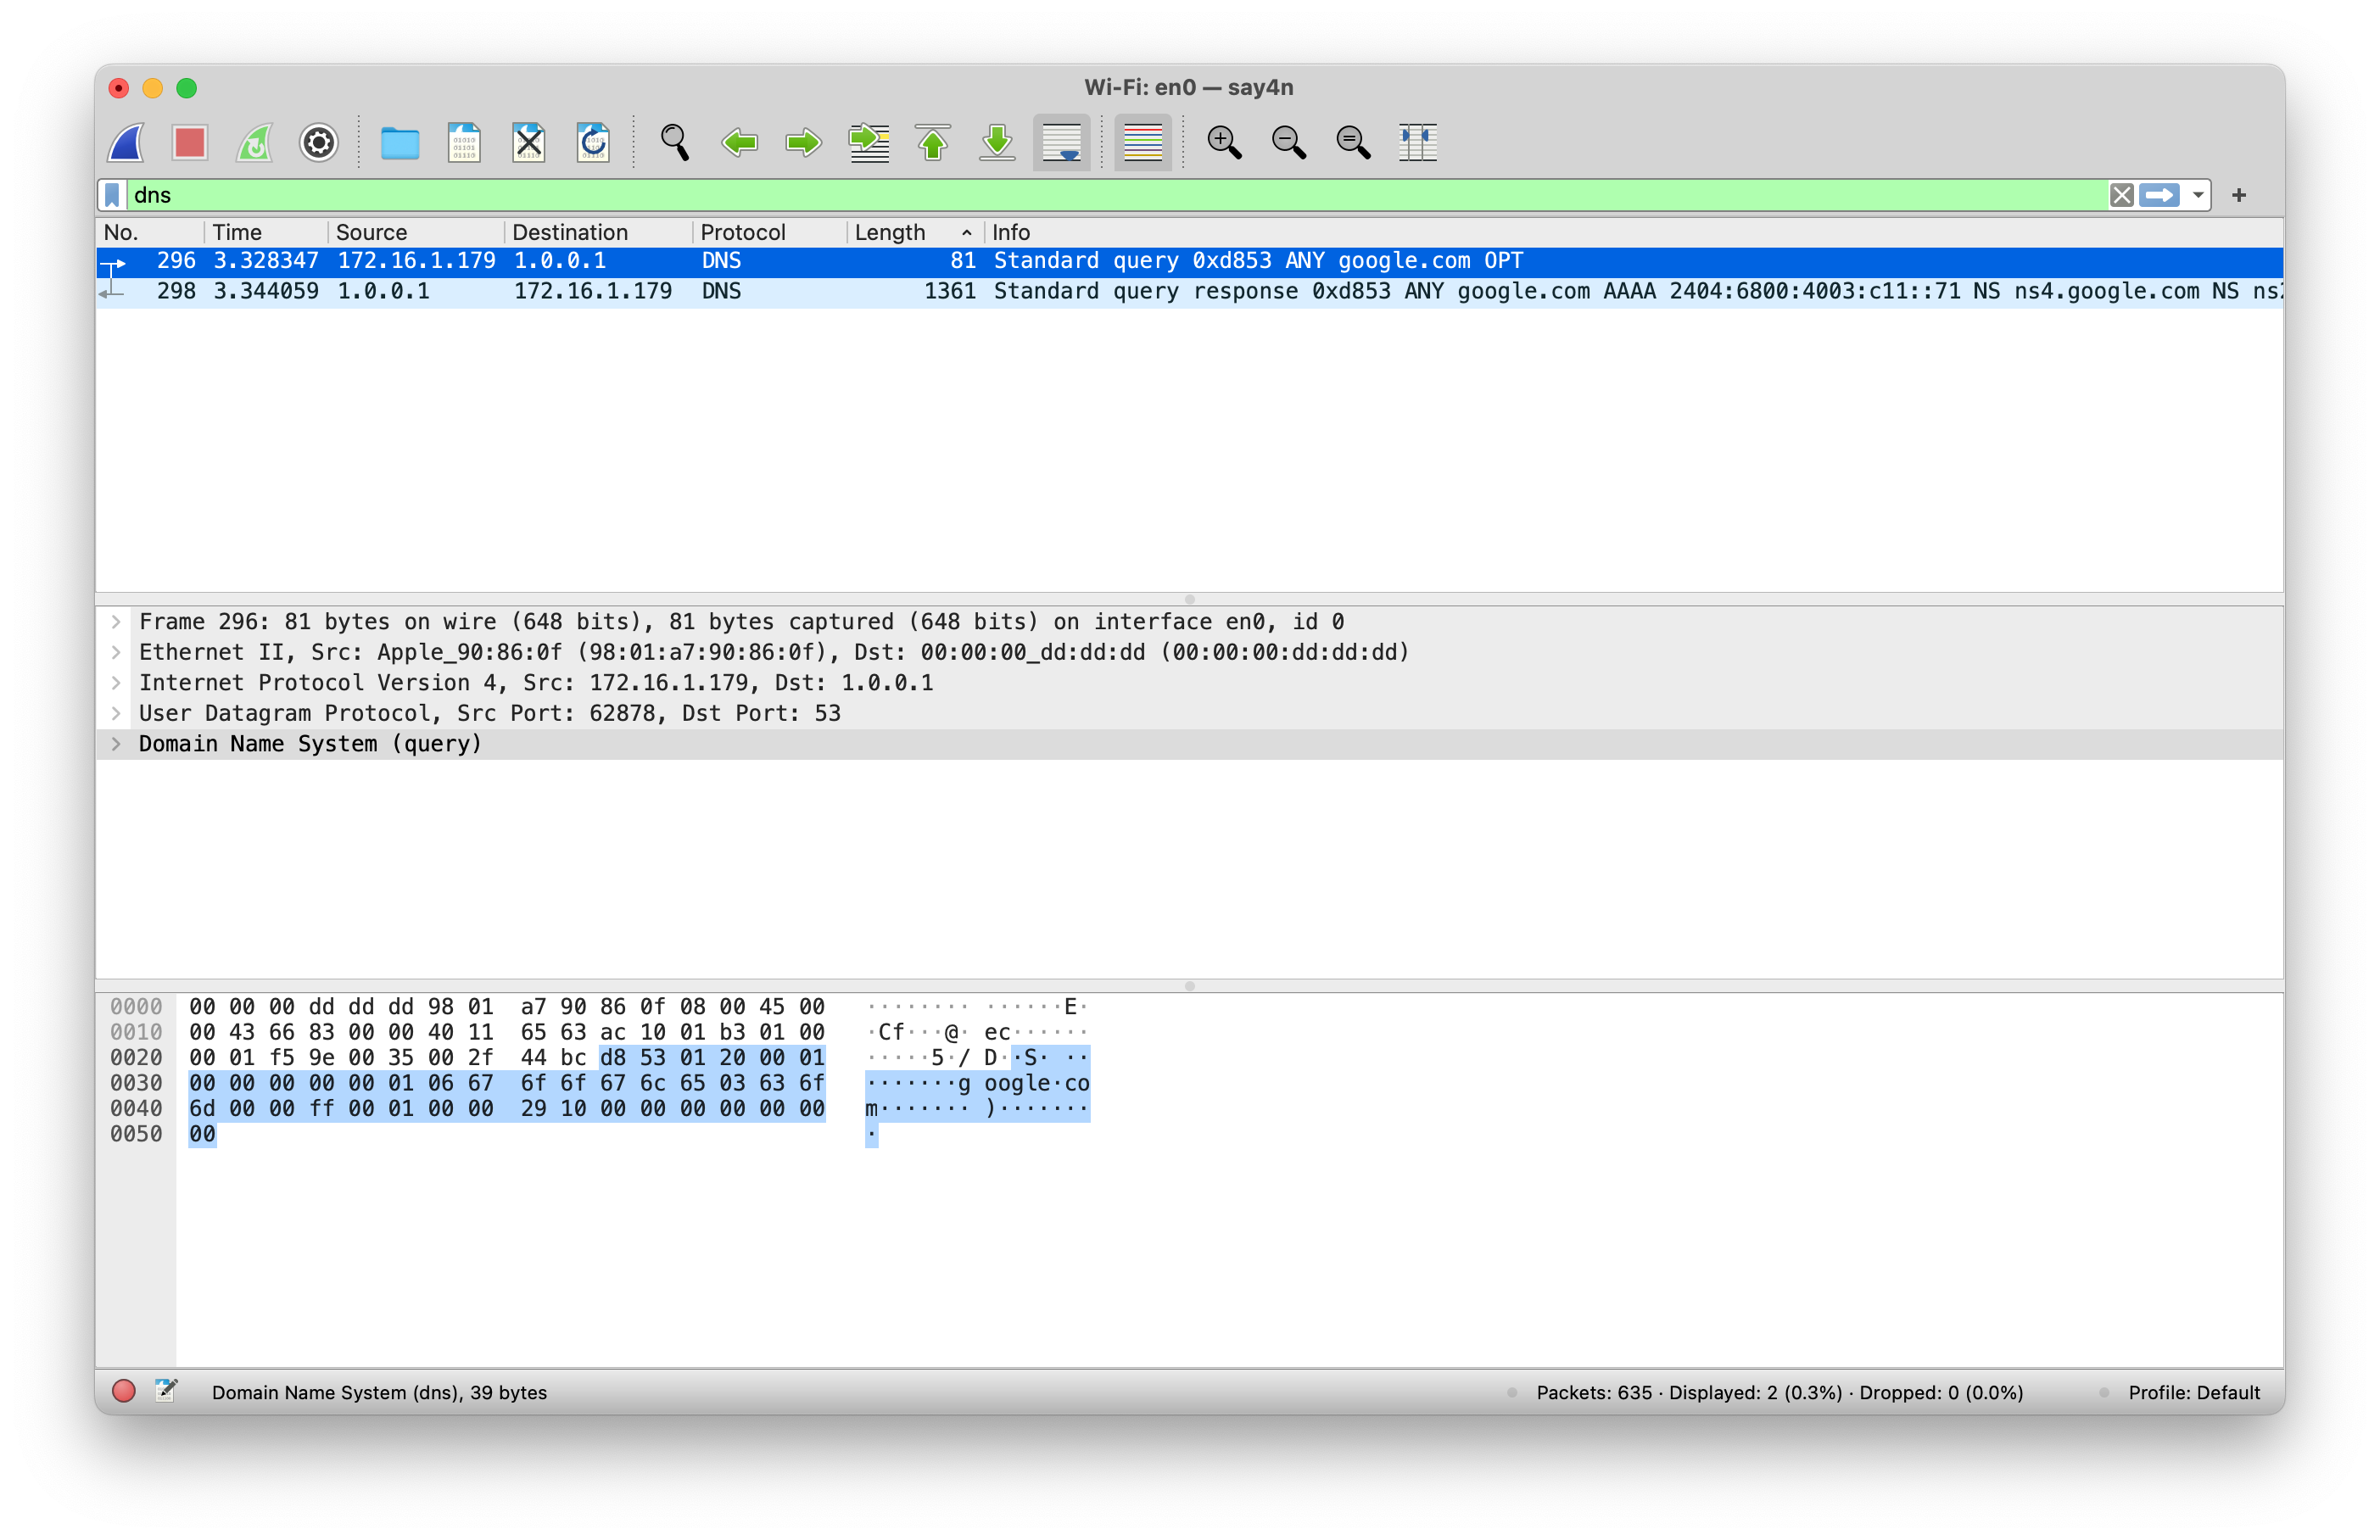
As you can observe from the screenshot, the outgoing request is a mere 81 bytes in length, whereas the incoming
response is 1361 bytes in length.
That is almost a <strong>17 times</strong> request to response ratio!</p>

<h1 id="but-how-is-it-an-attack">but how is it an <strong>attack</strong>?</h1>

<p>Now the keen eyed readers amongst you may have noticed the source IP address field from the screenshot of the DNS
request above.</p>

<p>What the attacker needs to do is to craft this DNS query in such a way that the source IP address for the query is
altered to be the attacker’s victim’s IP address.
When this is done, the responding DNS server will mistakenly assume that the the DNS query originated from the victim
and sends its response to malicious query to the victim server.</p>

<p>The attackers typically use large botnets to generate such spurious DNS queries and the deluge of responses from
various DNS servers causes the victim to become overwhelmed by the sheer bandwidth of traffic that it is ill-prepared
to handle.</p>

<p>The captured traffic from a DNS request with an altered source IP will look something like this.</p>

<p><img src="/images/dns-any-google-forged.png" alt="Malicious DNS request" /></p>

<p>
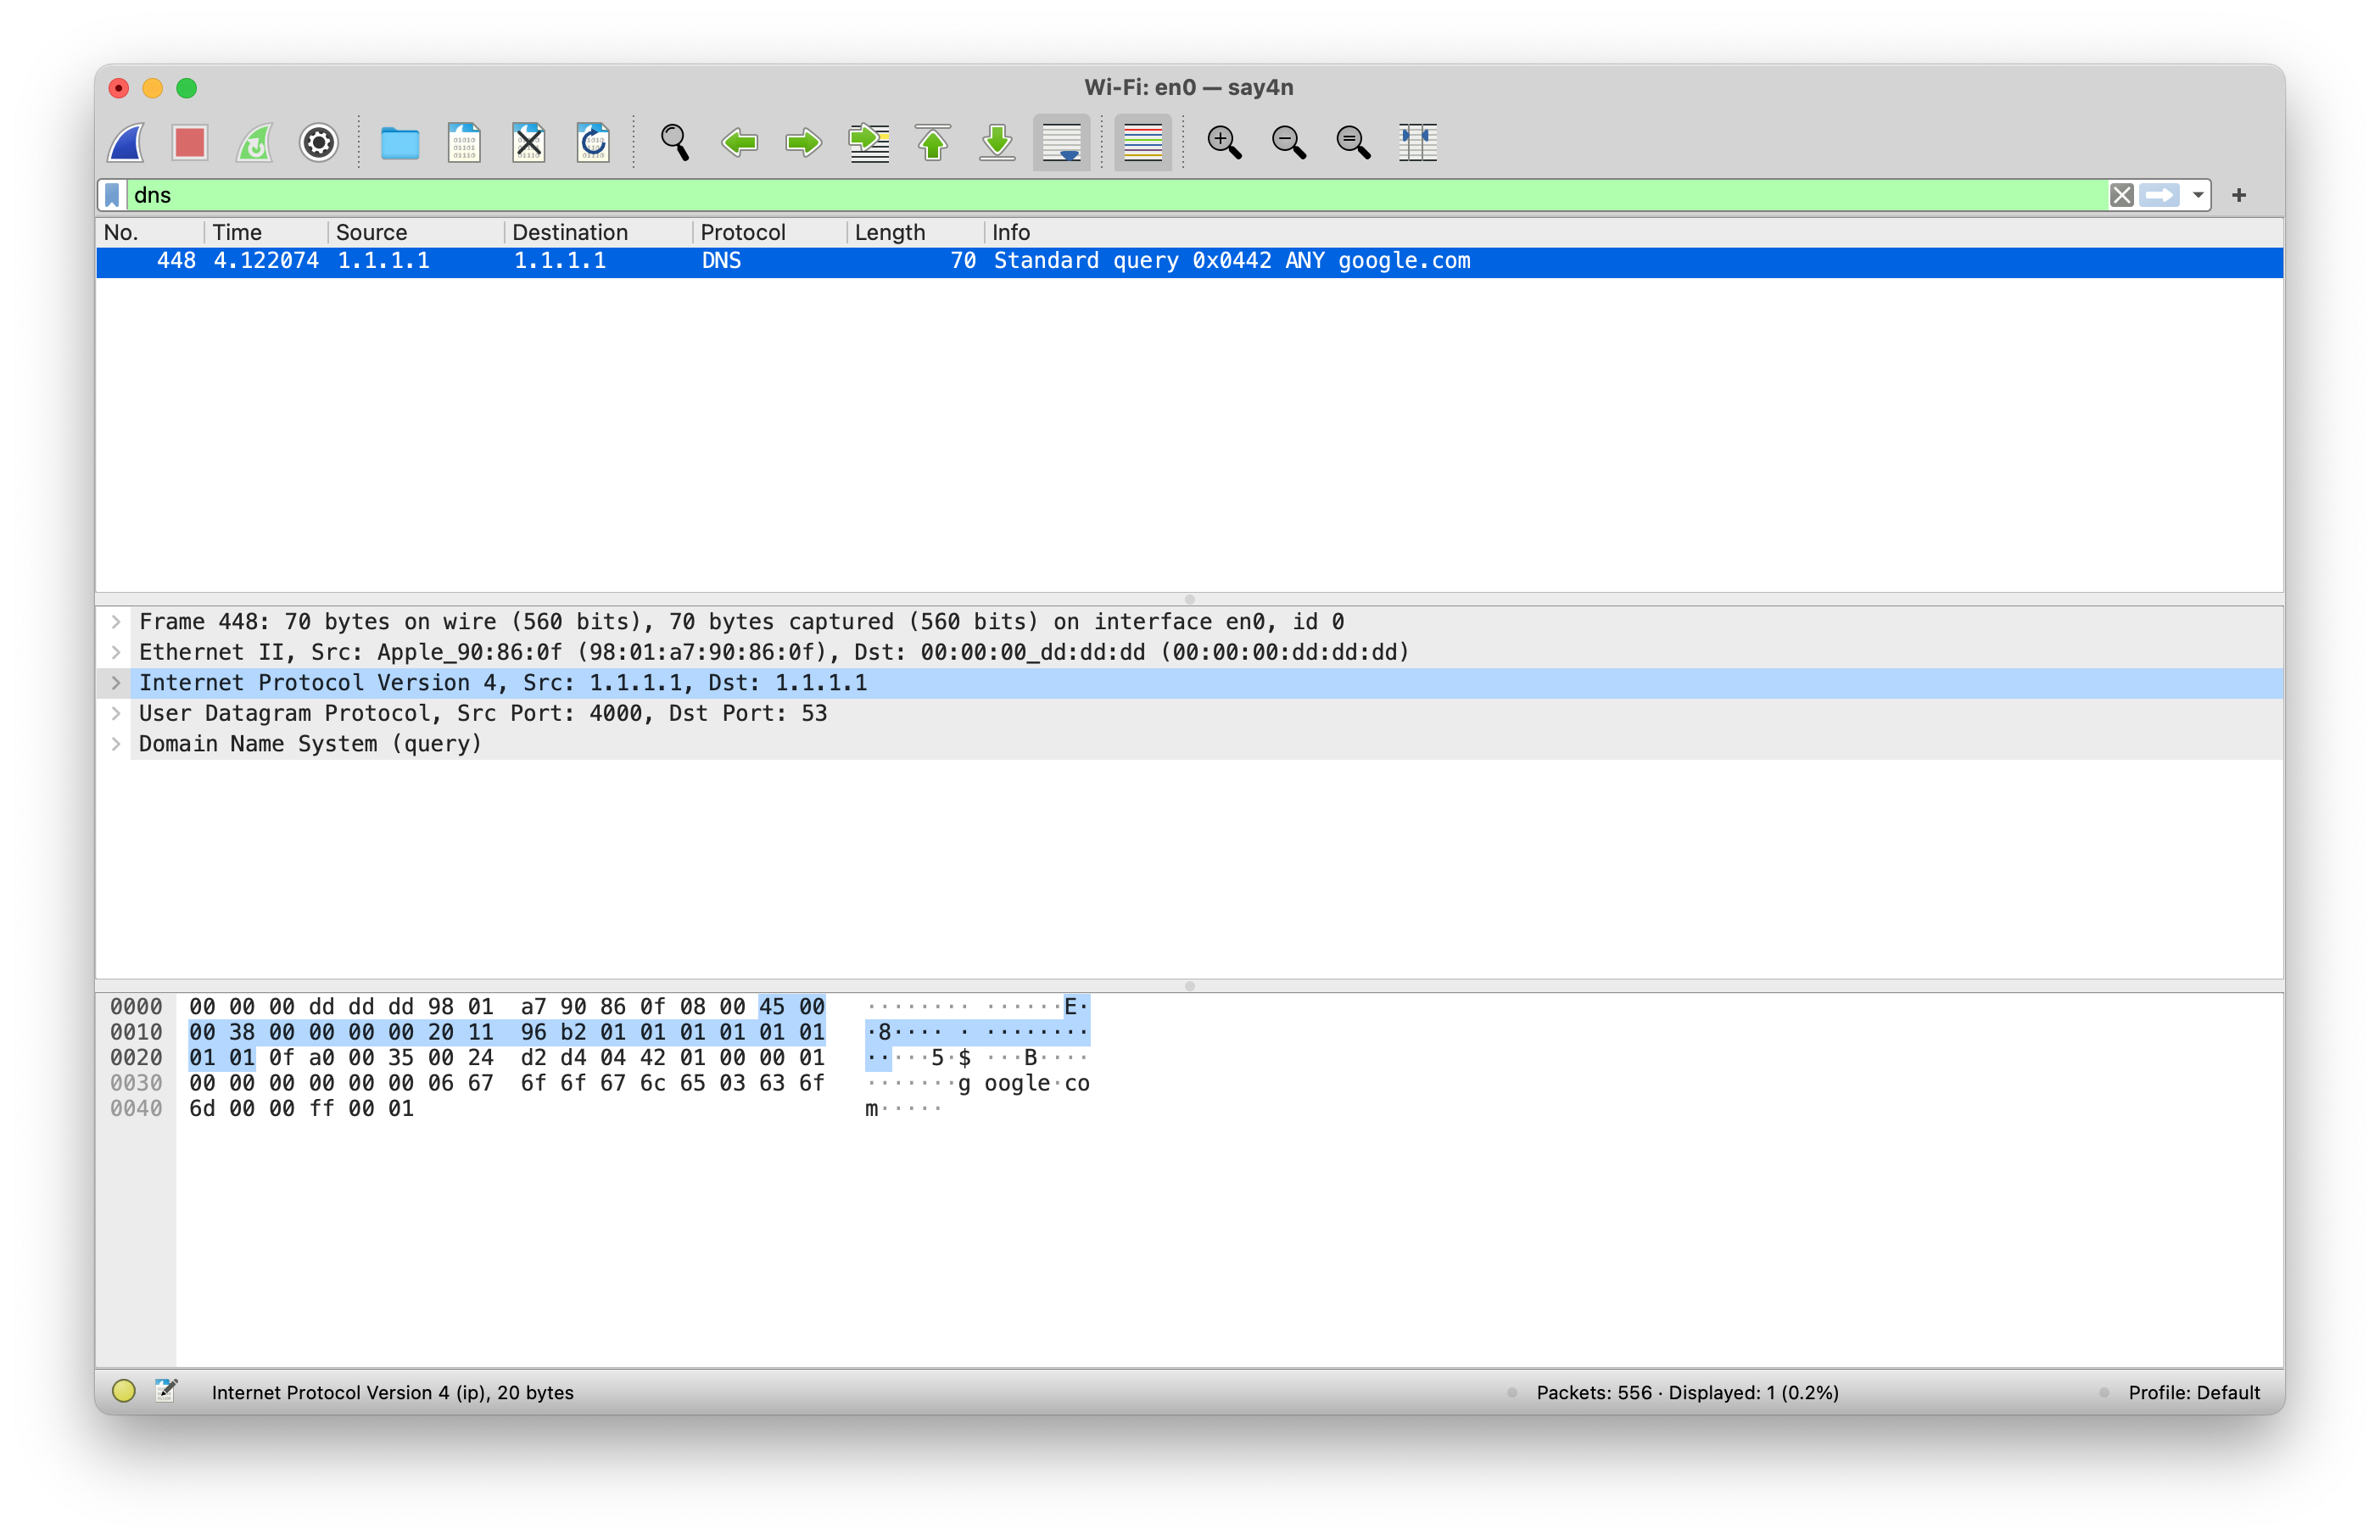
Notice the source and the destination IP address fields are the same in the picture and I can assure you that my IP
address is not 1.1.1.1.
When the DNS server replies (if it replies at all) to this query, it will be sent to the altered source IP address and
not the attacker’s original IP address.</p>

<h1 id="enough-talk-show-me-the-code">enough talk, show me the <strong>code</strong></h1>

<p>Visit <a href="https://github.com/say4n/dns.amplify">https://github.com/say4n/dns.amplify</a> to have a look at the source code.
The readme and the comments in the codebase should be sufficient to navigate around and play with it.</p>]]></content><author><name>Sayan Goswami</name></author><summary type="html"><![CDATA[A DNS amplification attack is a kind of distributed denial of service (DDoS) attack in which an attacker leverages open DNS servers to overwhelm a target with a huge influx of UDP packets. This influx of spurious traffic renders the victim inaccessible to legitimate traffic thereby accomplishing the denial of service.]]></summary></entry><entry><title type="html">Metal for Compute</title><link href="https://blog.sayan.page/metal-for-compute/" rel="alternate" type="text/html" title="Metal for Compute" /><published>2022-01-10T00:00:00+00:00</published><updated>2022-01-10T00:00:00+00:00</updated><id>https://blog.sayan.page/metal-for-compute</id><content type="html" xml:base="https://blog.sayan.page/metal-for-compute/"><![CDATA[<p>This blog post describes how to use Apple’s Metal API for computation on a GPU in a C++ project.
The accompanying repository is <a href="https://github.com/say4n/metal.compute">say4n/metal.compute</a> and is based heavily off of Apple’s <a href="https://developer.apple.com/documentation/metal/basic_tasks_and_concepts/performing_calculations_on_a_gpu">Swift/Objective-C original tutorial for performing calculations on a GPU</a>.</p>

<p>Be sure to check them out!</p>

<h2 id="before-we-get-started">before we get started</h2>

<p>Head over to Apple’s <a href="https://developer.apple.com/metal/cpp/">getting started with <code class="language-plaintext highlighter-rouge">metal-cpp</code> guide</a> and follow the
instruction in the section titled “<strong>Step 1. Prepare your Mac</strong>”.
Additionally, make sure to also follow the part of the instruction that describe how to use metal-cpp as a single
header include (section titled “<strong>Metal-cpp single header alternative</strong>”) in a project.</p>

<p>We will be using Xcode for development, I used version 13.2.1 (13C100).</p>

<h2 id="getting-started">getting started</h2>

<p>At this stage, this post assumes that you have the <code class="language-plaintext highlighter-rouge">metal-cpp</code> sources extracted to a convenient location and that you
have executed the command to use <code class="language-plaintext highlighter-rouge">metal-cpp</code> as a single header include by following the steps described previously.</p>

<p>The next step is to set up an Xcode C++ project.</p>

<h2 id="setting-up-an-xcode-project-for-c">setting up an Xcode project for C++</h2>

<p>Create a new project with the command line application template in Xcode with macOS as the target platform.</p>

<p><img src="/images/xcode-project-1.png" alt="" /></p>

<p>Make sure to select C++ as the language!</p>

<p><img src="/images/xcode-project-2.png" alt="" /></p>

<h2 id="configuring-xcode-to-use-metal-cpp">configuring Xcode to use <code class="language-plaintext highlighter-rouge">metal-cpp</code></h2>

<p>In the build settings tab under the project navigator, search for the “Header Search Path” and set it to the base directory where you extracted <code class="language-plaintext highlighter-rouge">metal-cpp</code>.</p>

<p><img src="/images/xcode-settings-1.png" alt="" /></p>

<p>Next search for “C++ Language Dialect” and set it to C++17 or higher.</p>

<p><img src="/images/xcode-settings-2.png" alt="" /></p>

<p>And that’s it, we are now ready to use the <code class="language-plaintext highlighter-rouge">metal-cpp</code> to interface with Apple’s Metal API in our C++ project.</p>

<h2 id="the-metal-shading-language">the metal shading language</h2>

<p>Our tiny metal program will perform the very basic operation of multiplication. To that end, here is the code that defines the operation in the metal shading language.</p>

<div class="language-cpp highlighter-rouge"><div class="highlight"><pre class="highlight"><code><span class="c1">//</span>
<span class="c1">//  compute.metal</span>
<span class="c1">//  metal-test</span>
<span class="c1">//</span>
<span class="c1">//  Created by Sayan on 28/12/21.</span>
<span class="c1">//</span>

<span class="cp">#include</span> <span class="cpf">&lt;metal_stdlib&gt;</span><span class="cp">
</span><span class="k">using</span> <span class="k">namespace</span> <span class="n">metal</span><span class="p">;</span>


<span class="n">kernel</span> <span class="kt">void</span> <span class="nf">work_on_arrays</span><span class="p">(</span><span class="n">device</span> <span class="k">const</span> <span class="kt">float</span><span class="o">*</span> <span class="n">inA</span><span class="p">,</span>
                           <span class="n">device</span> <span class="k">const</span> <span class="kt">float</span><span class="o">*</span> <span class="n">inB</span><span class="p">,</span>
                           <span class="n">device</span> <span class="kt">float</span><span class="o">*</span> <span class="n">result</span><span class="p">,</span>
                           <span class="n">uint</span> <span class="n">index</span> <span class="p">[[</span><span class="n">thread_position_in_grid</span><span class="p">]])</span>
<span class="p">{</span>
    <span class="n">result</span><span class="p">[</span><span class="n">index</span><span class="p">]</span> <span class="o">=</span> <span class="n">inA</span><span class="p">[</span><span class="n">index</span><span class="p">]</span> <span class="o">*</span> <span class="n">inB</span><span class="p">[</span><span class="n">index</span><span class="p">];</span>
<span class="p">}</span>
</code></pre></div></div>

<p>What this does is it takes array elements from two float array <code class="language-plaintext highlighter-rouge">inA</code> and <code class="language-plaintext highlighter-rouge">inB</code> and stores their product in a third array <code class="language-plaintext highlighter-rouge">result</code>.
You can read up more about the metal shading language in its <a href="https://developer.apple.com/metal/Metal-Shading-Language-Specification.pdf">language specification here</a>.
You can also follow Apple’s <a href="https://developer.apple.com/documentation/metal/basic_tasks_and_concepts/performing_calculations_on_a_gpu">Swift/Objective-C tutorial for performing calculations on a GPU</a> for a better introduction to programs in the metal shading language.</p>

<h2 id="the-driver-code">the driver code</h2>

<p>Now that we have defined our compute operation, we need to write the driver code that actually makes it all happen!
The files of interest and their respective functions are described in the following sections.</p>

<h3 id="maincpp"><a href="https://github.com/say4n/metal.compute/blob/main/metal.compute/main.cpp">main.cpp</a></h3>

<p>This is the main file that ties everything together.
It instantiates an <code class="language-plaintext highlighter-rouge">NS::AutoreleasePool</code> and a <code class="language-plaintext highlighter-rouge">MTL::Device</code> object.
It then instantiates an object of the compute wrapper class that we describe below.
Then it passes the Metal device to be used for compute to the said wrapper class.
The data for the compute operation is then prepared and the compute command is send.
Finally, the <code class="language-plaintext highlighter-rouge">NS::AutoreleasePool</code> is released.</p>

<h3 id="metalcomputewrapperhpp"><a href="https://github.com/say4n/metal.compute/blob/main/metal.compute/metalComputeWrapper.hpp">metalComputeWrapper.hpp</a></h3>

<p>This defines the <code class="language-plaintext highlighter-rouge">metalComputeWrapper</code> class, a wrapper class that takes a <code class="language-plaintext highlighter-rouge">MTL::Device</code> and performs operations define by the kernel in metal shading language.
It also prepares the various buffers as well as the data required by the various operations defined in the compute kernel.
It also verifies that the results produced after computation are as expected and lie within a margin of error.</p>

<h3 id="metalcomputewrappercpp"><a href="https://github.com/say4n/metal.compute/blob/main/metal.compute/metalComputeWrapper.cpp">metalComputeWrapper.cpp</a></h3>

<p>This file contains the implementations of the various member functions of the <code class="language-plaintext highlighter-rouge">metalComputeWrapper</code> class.</p>

<hr />

<p><strong>Note</strong>: This blog post is a Work in Progress and content may be added to it from time to time.</p>]]></content><author><name>Sayan Goswami</name></author><summary type="html"><![CDATA[This blog post describes how to use Apple’s Metal API for computation on a GPU in a C++ project. The accompanying repository is say4n/metal.compute and is based heavily off of Apple’s Swift/Objective-C original tutorial for performing calculations on a GPU.]]></summary></entry><entry><title type="html">Law of Iterated Expectation</title><link href="https://blog.sayan.page/lie/" rel="alternate" type="text/html" title="Law of Iterated Expectation" /><published>2020-12-12T00:00:00+00:00</published><updated>2020-12-12T00:00:00+00:00</updated><id>https://blog.sayan.page/lie</id><content type="html" xml:base="https://blog.sayan.page/lie/"><![CDATA[<h2 id="what-is-lie">What is LIE</h2>

<p>The law of iterated expectation or the law of total expectation states that</p>

\[E[X] = E[E[X \mid Y]]\]

<p>or, in other words the expected value of the conditional expected value \(X\) given \(Y\) is the same as expected value of \(X\).</p>

<h2 id="why-should-i-care">Why should I care</h2>

<p>Well, the LIE is used in the derivation of the Bellman equations of reinforcement learning, let me show you how.
From the definition of the value function (expected value of the discounted return), we have</p>

\[\begin{aligned}
V^\pi (x) &amp; = E_\pi \left[\sum_{t=0}^{\infty} {\gamma ^ t r(x_t, a_t) \mid x_0 = x} \right]\\
&amp; = r(x, \pi(x)) + E_\pi \left[ \sum_{t=1}^{\infty} {\gamma ^ t r(x_t, a_t) \mid x_0 = x} \right]\\
&amp; = r(x, \pi(x)) + \gamma E_y \left[ E_\pi \left[ \sum_{t=1}^{\infty} {\gamma ^ {t - 1} r(x_t, a_t) \mid x_0 = x, x_1 = y} \right] \right] \quad \color{CornflowerBlue}{\text{(LIE used here)}}\\
&amp; = r(x, \pi(x)) + \gamma \sum_y {P(y \mid x, \pi (x))} E_\pi \left[ \sum_{t=1}^{\infty} {\gamma ^ {t - 1} r(x_t, a_t) \mid x_1 = y} \right] \quad \color{CornflowerBlue}{\text{(by Markov property)}}\\
&amp; = r(x, \pi(x)) + \gamma \sum_y {P(y \mid x, \pi (x))} V^\pi (y) \qquad \blacksquare
\end{aligned}\]

<p>These are the Bellman equations for the value function!</p>]]></content><author><name>Sayan Goswami</name></author><summary type="html"><![CDATA[What is LIE]]></summary></entry></feed>